|
|
|||||||||||||||
|
What’s the weakest part of any differential? The cover! Let’s face it, whoever manufactured your differential - Jeep, GM, Ford, etc. - did not build it with plans for us to go around running into rocks! Of course, the idea is to avoid the rocks with correct tire placement, etc., but, if you’re into rockcrawling, sooner or later you’re going to run into a rock or two. If you’re lucky (as I’ve been), the most that’s going to happen is either a dented cover or a bent lip, usually resulting in a leak. I’ve seen worse, though; a cover bashed in so far that the ring gear wore a hole in it! What a mess!
There are several ways to protect your diff cover, other than avoiding rocks to begin with. One example is this bolt-on “bumper.” It works fairly well, but has its drawbacks. You can see why I installed it. I had to beat the cover back out with a hammer after backing into an unseen rock. The bumper has seen its share of rocks, which is evident from the gouges in it. The main disadvantage of this type of add-on protection is that it takes up more space than necessary and can also get hung on rocks. Also, it can get in the way of steering components when installed on the front diff – especially with custom setups.
With the Crane High Clearance Extreme Diff Cover you get several advantages. First, you replace the old, wimpy stock diff covers with a state-of-the-art Chromoly steel Alloy covers that are designed to take the abuse of the most aggressive wheeler. Also, you get special super strong “Holo Krome” button-head bolts (plus a spare), quality Permatex “The Right Stuff” sealant, and detailed instructions (more about that later). The fill plug is also raised to allow additional fluid for better lubrication - especially when the pinion angle is increased to compensate for suspension lift. As you can see in the photos, the cover is “lipless,” allowing it to scrape over rocks without catching. Another thing you get (Dana 44 cover) is about 7 pounds more metal than the stock cover! That’s right, according to my bathroom scale, the stock cover weighs about one pound and the Crane cover weighs about 8 pounds! You can understand why they have a limited lifetime warranty against defects in material or workmanship.
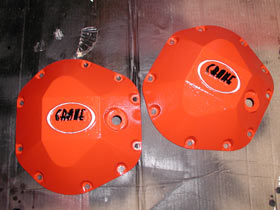
Installation Once I compared the stock cover to the CHC cover and found they matched perfectly around their circumference, I decided to use the old cover as a guide for my grinding away excess material. Take a look at these before and after photos and you’ll see what I consider to be the minimum amount of material you can “lose” on front and rear Scout Dana 44’s. There is quite a bit more “opportunity” on the front than the rear, but every bit helps increase ground clearance just that much more.
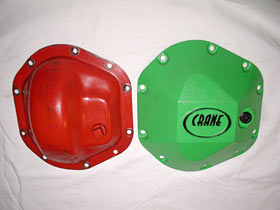
Those of you have seen my Jeep before know that my entire drivetrain is painted red. I do it for several reasons. One, it’s different. Two, I believe I can see things like oil leaks, etc. much better than if it were black, and three…because I like red! So, you’ll understand why I had to paint the Crane covers red. They normally come unpainted…the green is Crane’s trademark color, and that’s what they sent me. No offense, but that green just isn’t my color! Of course, you can paint yours any color you want! I did get a little carried away with a couple of “paint pens” I found at the local Office Max. (I figured it might make up a little for painting over the green if I hilighted the Crane logos on the covers.)
After draining the gear oil and removing the old covers, I cleaned out as much old oil as possible and wiped off the magnet I had epoxied inside the bottom of the housing when I built these diffs years ago. Using brake cleaner, I cleaned both the cover and the housing before applying a good ¼ inch-wide bead of sealant on the cover. I’ve found that putting the sealant on the cover is much easier than lying on the ground trying to get a nice, even bead on the housing. Then, just before putting the new cover up to the housing, I wipe it with brake clean at the bottom one more time. Line up the bolt holes, install your new Holo Krome bolts and torque them to 20 foot pounds and you’re done! Well, almost. Don’t forget to add your own favorite gear oil. I use the inexpensive stuff since I change it at least four times a year (due to possible water intrusion) and my Jeep is pretty much a trailer queen now. If you drive your vehicle daily, I might suggest synthetic oil. Synthetics withstand heat much better than regular oil. I run Mobil 1 in my engine because it gets pretty hot here in Texas!
TESTING TESTING TESTING! --->>>
|
|||||||||||||||


|
Help spread the ROCKCRAWLER world!
|