 One
thing's for sure. Once you start building up your Jeep Wrangler
(TJ), it will get louder. Even if you don't build it up but use
it for trails, the squeaks and pop will increase, making it more
and more difficult to hear your stock stereo. Not only that, but
if you leave your top down a lot and leave the doors out, the
sun, rain and dust will find its way into your stock, paper-coned
speakers and they will deteriorate over time. You will eventually
want to upgrade your speakers.
One
thing's for sure. Once you start building up your Jeep Wrangler
(TJ), it will get louder. Even if you don't build it up but use
it for trails, the squeaks and pop will increase, making it more
and more difficult to hear your stock stereo. Not only that, but
if you leave your top down a lot and leave the doors out, the
sun, rain and dust will find its way into your stock, paper-coned
speakers and they will deteriorate over time. You will eventually
want to upgrade your speakers.
Our Project
TJ is over six years old and our speakers were tired - really
tired. Not only that, but when we built our new roll cage we removed
the sound bar. So what was left were two old speakers in the dash
that had seen better days. It was time for a change.
There are
plenty of aftermarket stereo options out there to choose from
but we wanted to do a simple swap. We didn't want to put in a
competition stereo or anything like that. We just wanted some
new speakers. The stock TJ speakers are 4" x 6" which
do not have as many options for replacement as, say a 5 1/4"
speaker. Also, many people believe that a circular speaker sounds
better than an oval-shaped one. The problem is, you cannot mount
a 5 1/4" speaker in a TJ dash - at least without doing some
work.
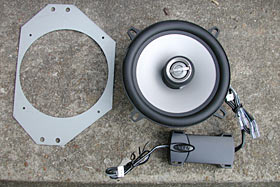
The guys at
the Offroad
Toy Store have already figured all this out, though,
and have made a bracket kit that installs easily and will allow
you to mount most 5 1/4" speakers. Now under the name 33
Engineering, the brackets are simple in design and run a
mere $25.99, which to us was seems well worth the money compared
to engineering a bracket ourselves.
Kappa
Specifications
Retail Price: $169.95 pair
Power - RMS: 55 Watts
Power - Peak: 165 Watts
Frequency Response (±3dB):
55Hz – 21kHz
Sensitivity: 90dB
Impedance: 4 Ohms |
In addition to
the brackets, we also ordered a set of Infinity Kappa 52.3i speakers.
The Kappas sell for about $130 at offroadtoystore.com
and are capable of handling 55 Watts. They are a multi-element design,
featuring a separate tweeter and a computer-optimized, voice-matched,
passive, external crossover. Because of the tweeters, high-end
(treble) extends all the way up to 21kHz - well above what most
of us can hear.
Another really neat
feature of the Kappas is the UniPivot™ design of the tweeter.
UniPivot allows the tilted tweeter to rotate 350 degrees. This
allows you to better aim the tweeter at your listening position,
which is particularly helpful when mounting down low in your dash.
Installation of the
speakers and brackets is fairly simple and the only things you
will only need a few tools and items to do it. We do recommend
picking up some foam or speaker baffles from your local car audio
store to put behind the Kappas. We did not do this during the
initial installation, however, putting a baffle behind the speakers
will help them to project more sound out of the front and give
a better tone and more volume. Without a baffle, much of the sound
will go into the dash itself and not allow you to get the most
out of your new speakers.
If you're looking to
upgrade the sound in your TJ, one of the first places to look
should be at your in-dash speakers. For around twenty five bucks,
you can get well-machined brackets to adapt just about any 5 1/4"
speaker on the market from Offroad Toy Store. Add another $130
and you can get a set of these nifty Infinity Kappas and you're
good to go. Then you can have a look at upgrading those soundbar
speakers - but that's another story.
Installation
Installation is a snap and should only take about an hour or so.
Follow along as we walk you through it.
Things You'll
Need
- Phillips-head
screwdriver
- wire cutters
- electrical butt connectors
- electrical tape
- 4 wire ties
- 8 self-tapping screws
- some sort of metal saw or cutting wheel.
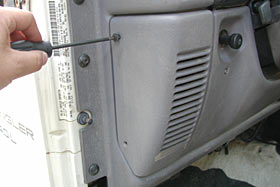
Remove the 2 screws holding the speaker cover on |

Take out the 4 screws holding the speaker in |
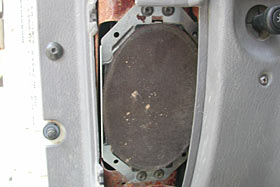
Once screws are out, you can pull the speaker out. Then
unplug the wire harness from the speaker. |

Cut the plastic connector off of the wire harness. You won't
need it anymore. |

We wired up the leads from the crossover for a quick test.
They are marked "woofer" and "tweeter"
for you. Be sure to keep your (+) and (-) right to keep
your speakers in-phase with each other. |

Here's the fun part. Use a saw, cutting wheel or Roto Zip
and cut where we show you in the photo above. Be careful
that flying sparks don't cause a fire. We put something
behind the metal as a shield. |
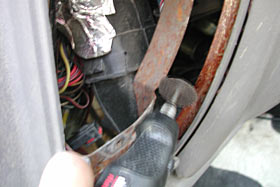
You can use a small cutting wheel like a Dremel Tool or
similar, however, we ended up bringing out the big dog Roto
Zip. The metal is actually a lot tougher than it looks. |

Here you can see our first cut. You can take your time and
smooth out the metal if you like. We didn't bother since
it will all be covered up anyway. |

Top and bottom both cut. At this point, couple the input
wires to the crossover with the leads from your stereo.
We crimped on butt connectors but you could also twist them
and tape them together. |
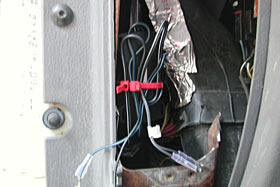
Bundle your speaker wires and crossover together and wire
tie them onto the inside frame of the dash. You're now ready
to mount your speakers to the Offroad Toy Store/33 Engineering
Adapters. |

The speakers mount easily to the adapters using four self-tapping
screws. The holes are pre-drilled, but you'll need to supply
the self-tappers. |
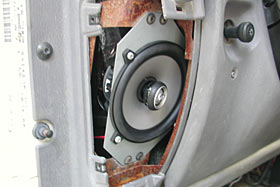
Connect your speakers the same way you did during your wiring
test. Hold the speaker in place and put your original four
screws back in. Then replace the cover. Aim your tweeter
and do the other side. |
