|
|
|||||||||||||||||||||||||
|
On
the trail
Now that was enough goofing off around the garage. It was now time to see how the Outback performs out on the trail. To find out, I headed out to Kruse Off-road Park located outside Mason, Texas (actually it's in Katemcy). Katemcy has excellent off-roading. It's like a mini-Moab. It has lots of granite domes to do some serious rockcrawling Texas style. The granite in Katemcy is as sticky as the slickrock in Utah so there is plenty of traction. In fact, it's so sticky, it's not uncommon to quickly frag weak front u-joints or axle shafts.
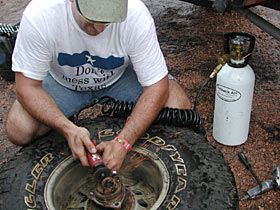
Throughout the weekend, anytime someone needed air on the trail the Outback was there for them. Airing up tires is the Outback's primary purpose and it's FAST. Since installing the Outback I have a friend who only airs his tires below 10 psi if we are running together because his tires spit air on every major rock and he might have to air up several times throughout the day. On Sunday afternoon even our trail guide came up to me and asked Hey you've been using that thing all weekend got any air left that I can have? Of course I did so Randy aired back up from about 2 psi to his usual 8-10 trail pressure. About half way through our Sunday afternoon run, Ken Ferguson in his beautifully-equipped Rubicon spit out a u-joint cap on one of his front drive shafts. We figured this would be an easy fix since we had spare u-joints and air tools to complete the job quickly. We quickly pulled Ken's axle shaft with the use of the pneumatic impact wrench and 3/8 drive connected to the Outback. Unfortunately, he had slightly tweaked the ears on the inner shaft and even after pulling the remaining cap, we were unable to remove the body of the u-joint. Time for extreme measures I've started carrying with me a small air grinder outfitted with a cutting wheel so I handed it to Ken and said, start cutting.
Now the Outback is an awesome tool but it does not replace the speed or volume of a shop compressor - obviously. With that said, it took a little while to cut away enough of the u-joint to get it out of the shaft but without the Outback or air grinder we would have sent Ken back to camp on three-wheel-drive. Another success story.
The Outback System comes with the following items:
Outback is currently working on an ARB kit to plumb your ARB into the system, as well. For our trip to Katemcy I installed one of their pre-production ARB kits under my hood. The set-up is great-looking and super easy. Unfortunately, on our weekend run I rolled my Jeep and completely trashed the regulator due to a poor installation location. My hood caved in and broke off the regulator obviously no fault of Outback. Sadly I do not have any photographs of the setup, but suffice to say that the kit was easy to setup and install. Everything not included with the kit was available at my local Home Depot. My kit included a multi-port manifold which I mounted under the hood and a pressure regulator which dropped the 150 psi coming out of the Outback to 90 psi for the ARB. The only things I needed for the install were a length of compressor hose, hose clamps, some miscellaneous brass connectors/adapters (available in the plumbing sections of any home improvement or hardware store) and some wire for the ARBs' electrical connection. Easy! Conclusions
The bottom line is that I believe that the pros far outweigh the cons for most people looking for an affordable and reliable onboard air system. When I buy another Jeep for my wife (the loving understanding wife previously mentioned) I'll buy another Outback for her, too that's how impressed I am with the system. For more information check out the Outback Equipped web page at www.outbackequipped.com. They have addition information regarding other accessories, places to have your tank filled, recommendations on mounting your tank, and safety precautions anyone with a high pressure tank should be aware of. If you're looking to get one for your rig, they are available through a dealer network, including www.4x4ROCKSHOP.com.
|
|||||||||||||||||||||||||
 Randy
Kruse airs back up after loosing too much tire pressure.
The primary purpose of the Outback Air System is to air
up tires and it's FAST.
Randy
Kruse airs back up after loosing too much tire pressure.
The primary purpose of the Outback Air System is to air
up tires and it's FAST. 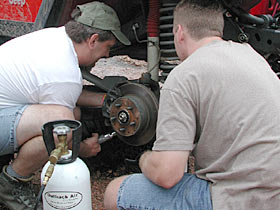
|
Help spread the ROCKCRAWLER world!
Share on Facebook
|