 Finished Tail Lights! |
One
problem still remained. The resistance of the flasher circuit has changed with
the replacement lights. The flashers were blinking at a very fast rate.
In the old days this was easy to solve by replacing the flasher with
a heavy duty unit made to handle the extra load of connecting trailer
lights. Not the case anymore. The flasher unit used on the TJ is electronic
and has more circuitry than just a relay. I stopped by one local parts
house and even called my friendly Jeep parts guy and they didn't list
a replacement or heavy duty flasher for the TJ. I went to a second parts
house and found some electronic flashers hanging on the peg that were
similar to what's used in the TJ.
The
flasher I picked up had five terminals instead of four, like the original
unit. I figured I could make it work somehow and with the dealer price
on the original being $30 dollars, I didn't want to mess it up. Once
I had the covers off of both flasher units they appeared to be almost
identical on the inside. The flasher unit I used is made by TRIDON Stant
and is model EP27. After comparing the 2 units, I'd guess that this
is who OEM's the units for Chrysler. Using the factory service manual,
I figured out what terminals went to what on the original unit. I connected
a 12v source and a test light to verify terminal operation. I then connected
the new flasher unit in the same manner. The test light didn't blink.
On the factory unit, the flat terminal on the bottom is the output.
On the new flasher, the middle, or extra terminal is used for the output.
I next took some test leads and connected the new flasher into the factory
harness to see if it slowed down the flash rate, and it did. After thinking
about ways to modify either the factory harness or the new flasher,
I decided it would be easier to modify the flasher unit than mess with
the factory wiring harness.
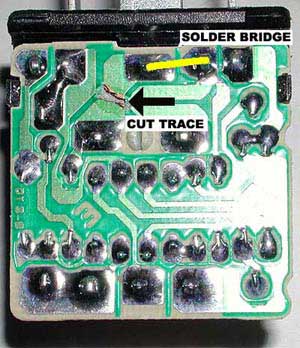
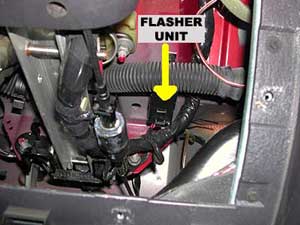
Pretend your right knee is the camera that took the above photo.
The flasher unit is hidden in the dash behind the steering column.
As you can see in
the photo, the modification was easy and only took a few minutes. I simply
cut the trace on the circuit board shown with the black arrow, and put
a jumper between the two solder pads shown in yellow. If the flasher unit
ever goes out, I have the original to use until I can get another one
to modify.
One
thing to note here: When I was at the parts house, they did have 3 terminal
electronic flashers that might have worked. When I first picked up the
5 terminal flasher, I didn't realize that the factory flasher only used
3 of the 4 terminals. At $12 a pop I didn't really want to keep experimenting.

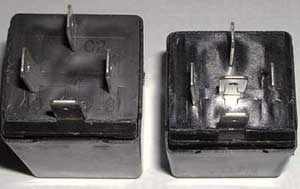
The original
flasher has four terminals and is longer than the replacement
 |
|

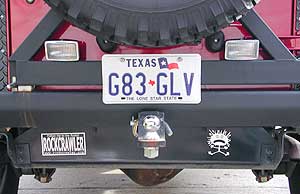
I mounted a set of utility lights on the inside edge of the tire carrier. I have these wired into the backup light circuit. Another bracket holds the license plate to the tire carrier. The top plate bolts are the Lite'n-Boltz. I have these wired into the parking light circuit.
While I was at Doug's picking up the Lite'n-Boltz, I had him drill out the center of the bolt that holds the utility light to the tire carrier. The hole is just large enough for the hot lead to pass through. To mount the new reverse lights, I drilled and tapped the tire carrier. I have the wiring for the backup lights and license plate lights running inside of the lower tire carrier brace. The wires exit on the right side next to the bearing unit and run up under the corner panel were they tie into the factory wiring harness.
 |
|
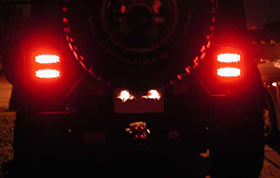
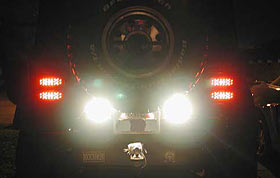
Here are a couple of night shots. The picture on the left shows the tail lights and license plate lights. This is just the tail lights, when I step on the brake they get a whole lot brighter. I feel sorry for anyone in a car sitting behind me at a red-light, at eye level staring into them is painful. The picture on the right shows the reverse lights in action. The bulbs used in the lights are type 1156 rated at 50 watts each.
 |
|
Intro | The Panels | LED Lights | Finish
|
Help spread the ROCKCRAWLER world!
Share on Facebook
|