Revolver Shackles
 Once
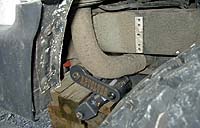
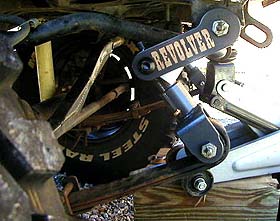
you are ready to set the first Revolver into the frame mount, orient the
shackle with the zirc fitting pointing outboard. Remember to place the
shackle with the relief in the yoke pointing toward the spring pack. This
will be the same for all four corners. Every install will be different
and you may have to troubleshoot some things that are specific to your
vehicle. On the Samurai, the factory stop tabs for the rear shackle had
to be cut off, as per Curt's instructions.
Once
you are ready to set the first Revolver into the frame mount, orient the
shackle with the zirc fitting pointing outboard. Remember to place the
shackle with the relief in the yoke pointing toward the spring pack. This
will be the same for all four corners. Every install will be different
and you may have to troubleshoot some things that are specific to your
vehicle. On the Samurai, the factory stop tabs for the rear shackle had
to be cut off, as per Curt's instructions.
I have 3" National springs and did not have any problem with the fuel filler hose, which is on the passenger side. A 4" spring may have a problem with it. If so, you may have to make the necessary modifications. A body lift will help to clear this if it becomes a problem.
After bolting up the frame mounts, you should be able to slide the shackle into place with ease. If you choose not to replace your bushings, you may notice that there is a small gap about 1/8th" thick between the shackle and the bushings. There are also thicker bushings available but to save yourself some time and money, you can get a USS 1/2" washer for each side of the shackles. Altogether, you will need two per shackle. Curt has this available powdercoated if you need them.
After bolting up both sides, you can let your jack down and watch the shackle take shape at rest. Once you see what it does when you let the vehicle down, you'll get the idea of where the better ride will come from.
 Now
you can move to the front end. On the Samurai, unless you modify the sway
bar it's gotta' go. The pivot on the shackle will rest on top of the sway
bar and it will not work. I was very proud of the fact that I hand-made
sway bar disconnects for my 4" lift last year and did not want to lose
it. It had to go, though, so I took it off.
Now
you can move to the front end. On the Samurai, unless you modify the sway
bar it's gotta' go. The pivot on the shackle will rest on top of the sway
bar and it will not work. I was very proud of the fact that I hand-made
sway bar disconnects for my 4" lift last year and did not want to lose
it. It had to go, though, so I took it off.
After the front end was finished I took the Sammy for a ride and didn't even notice it was gone. I can go back at any time and bend it up and modify it some more to get it to fit, but after the ride, I'm not going to bother. Obviously, your setup may vary, so use good judgement.
Jack up the front end and get the tires just barely off the ground. Support the frame and block the rear just as you did the front. Unbolt the front shackles and remove them. Same as the rear, face the pivot to the center of the vehicle with the zirc facing outboard. Bolt the frame mount in first and then bolt the spring mount in.
After you get both sides bolted up, let the vehicle down slowly and watch the shackle take form. At this point you want to get everything out of the way. This is where you are going to see what else is needed for you to take full advantage of the shackle. This is very simple to do. Block the tires at one end. Go to the opposite end and jack it back up. When you get the tires barely off the ground, take a look at your brake lines and see if they're long enough. If not, you need to replace them. Same goes for the shocks.
You can also undo the shocks from the lower mount and let the axle droop as far as it will go. Pull your shocks out to see if they will extend far enough to bolt up. If so, you're good to go. If not, it's costing you wheel travel.