
Back to Features Page
By, CHAD CROWELL
York Air Install for Jeep TJ-Part 2
Installing the York Compressor
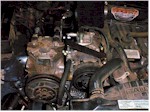
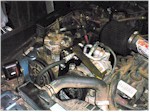
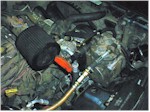
Once your fender is cut (if needed), its time to install the York. Have a friend hold the York up to the main bracket with the pulley facing forward. Using the supplied 3/8" x 1" bolts and washers, bolt the York to the main bracket in four places. Some of these are hard to reach, but keep trying and you'll get them! Don't tighten the bolts completely yet. Instead, install the supplied V belt over the alternator pulley and York pulley (be sure to place the sepentine belt inside the V belt first or you'll have to remove the V belt later!). Now, slide the York upward to tighten the V belt and tighten those four bolts. Make sure the belt is sufficiently tight, with about 1/2" of play in it when pushed down halfway between the pulleys. Double check all bolts, install your serpentine belt, and you are all set! Here are some pictures of the completed installation:
The Kilby Enterprises kit also comes with new manifolds for the top of the York, incase you bought one with the Ford style looping manifolds. Replacing these is easy, just make sure to replace the O rings when you install the new manifolds. I found the York bracket kit to be a perfect fit, and easy to install. All the parts were included, and easy to identify. For the first time I can drive around with no vibrations coming from the York, because the Kilby kit secures the compressor to more than one location on the A/C pump mount. All welds and plating on the parts were professional and solid. And Brad Kilby is a very nice guy to associate with, to boot! Look for information on this and other Kilby products soon at www.onboardair.com.
The York compressor installation took me about an hour, at an easy, Corona-style pace. Of course, I have had a York for over a year, so my fender was cut, and I had also recently installed a 175A alternator. Because of my familiarity with assembly of this area of the engine, the install went quick. I would recommend about three hours total if you are starting from scratch. I can tell you I should have bought the Kilby kit the first time around, it would have eliminated many, many obstacles!
So now you have an antique hunk of iron bolted to your engine...now what? Let's get this system built!
Some information courtesy of the Jeep Tech pages.