
Back to Features Page
By, CHAD CROWELL
York Air Install for Jeep TJ-Part 2
York Lubrication
Before firing up the York, you'll need to check the oil. Since there are moving parts inside, we want to keep them cool and running smooth. Regular old 10W-30 can be used. To check the oil level, remove the bolt on the side of the York that is right in the middle of the body; you can't miss it. Bend a coat hanger and make a 'dipstick' that will go into the hole and touch the bottom of the reservior. Squirt in oil until the dipstick is about 1" covered with oil upon measurement. Your compressor may blow some oil, or may not. Re-insert the bolt and it is ready to pump. You should periodically check the oil level. I got to a point where I knew about how many trips I could take before checking the oil level.
Adding Basic Accessories
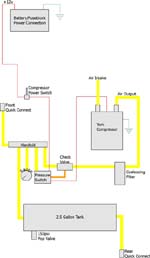 Here is what we are aiming for in the next step. This setup will get you up and running with a pressurized air system. You'll be able to fill tires, run air tools, and fill rafts and such. You'll want to use 3/8" air hose for the system and buy fittings with 1/4" npt threads. I recommend Good Year Gorilla hose, which runs about $45 for 25 feet. It is rated to 500psi and 200°, neither of which you will ever get close to. Here are the parts you will need:
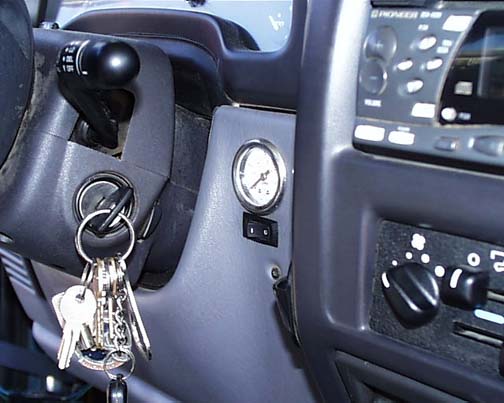 ON/OFF SWITCH - Any toggle switch that you like will work here. Mount it either in the cab or under the hood where you can easily get to it. Wire it to a constant +12v source at your fusebox. Put a 15A fuse inline between the switch and the fusebox. Mount the switch, and run the other lead off the switch to...
 PRESSURE SWITCH - This will mount in your engine compartment with the rest of your air system accessories. This device is adjustable and cycles your compressor on and off automatically. Usually it will have a 40psi cycle differential, which can be adjusted to the on and off levels you desire. Mine is set to come on at 85psi and let the compressor fill the system until it reaches 125psi. This keeps the system full rather than switching the compressor on and off manually. It is also a safety factor, as your system can become overpressurized. I recommend you don't let your system pressurize to more than 130psi. That amount will easily power any tools or fill any tires sufficiently. Pressure switches can be bought at industrial supply houses such as Grainger. You are best off with one with a fixed differential of about 40psi, and an adjustable on/off level. Also get one with an unloader port.
The second lead on the pressure switch should be run to your York, and spliced into the single wire that comes out of the York. The York grounds through its chassis mount, so hooking up the switches and starting the engine should allow you to flip the toggle switch and turn the York on and off.
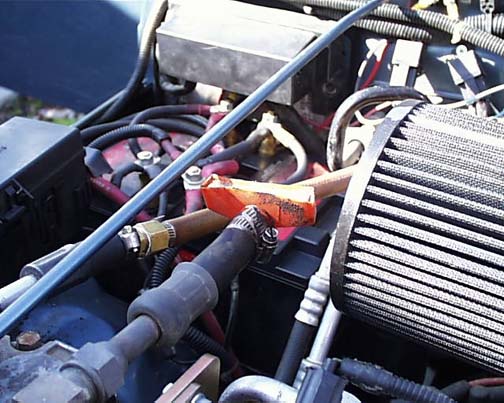 INTAKE FILTER - Buy a small air filter from an auto parts store that can slide into the intake hose on your York. This will help purify the air going through the system. Use a hose clamp to hold it on tightly.
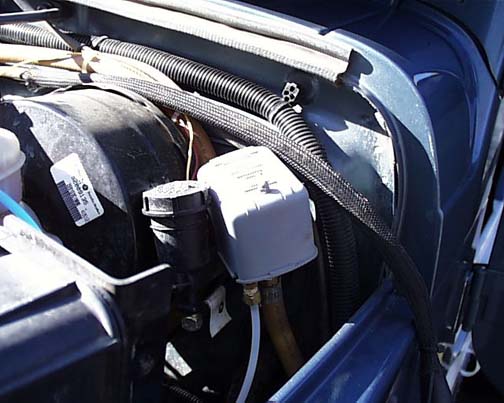
 OIL FILTER - You are best off spending a few bucks on an oil filter to keep oil out of the rest of your system. This filter goes first in line on the output side of the York. On recommendation from Paul Nasvik's installation, I bought a 'coalescing filter' from Grainger. You can also buy a small mounting bracket that easily attaches to the firewall. Any oil blown by the York will be separated here and dumped into a bowl that you can remove. The oil can be poured right back into the York through the fill hole in the side.
 CHECK VALVE - This is a one-way valve. It basically allows air to flow from the York, through it, into the rest of the system. Air can not, however, flow back through the valve into the air line between the valve and the compressor. Buy a check valve with an unloader port, and run a line from the port to the unoloader port on the pressure switch. When the pressure switch cycles the compressor off because it has reached its maximum pressure, it will open the unloader port, releasing the air between the York and the check valve, so the compressor does not have to start under load. This will lengthen the life of your compressor.
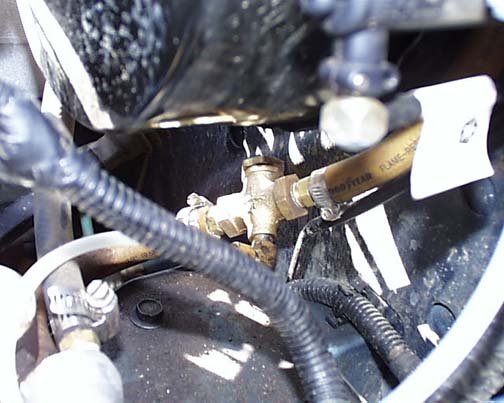
MANIFOLD - This is where your air line coming from the York is divided into several other air lines that run to your accessories. There are many types available. To make one with the number of ports I needed, I bought two 4-port manifolds and connected them together. This left six ports: one air inlet from the check valve, and five outlets.
The manifold can grow as your needs grow. You can always run a hose from it to another manifold if you need more air outlets. Remember, the entire air system will pressurize; every hose, fitting, and accessory you build into the system. Where do my five outlets go? 1) Front quick disconnect; 2) Air tank; 3)Pressure gauge; 4) Pressure switch; 5) ARB system.
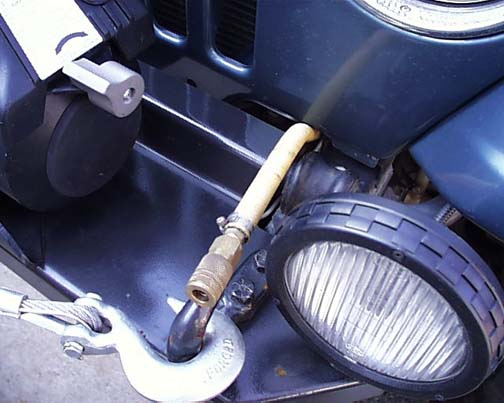 FEMALE QUICK DISCONNECTS - These are on the end of the air hose, and are where you attach accessories to perform work. I have one coming out through the grill, and one tucked up under the rear wheel well. This way, I can attach a coiled air hose to either one and inflate my tires, or the tires of people in front or behind me, or run a tool as far away from the Jeep as the coiled hose will let me go.
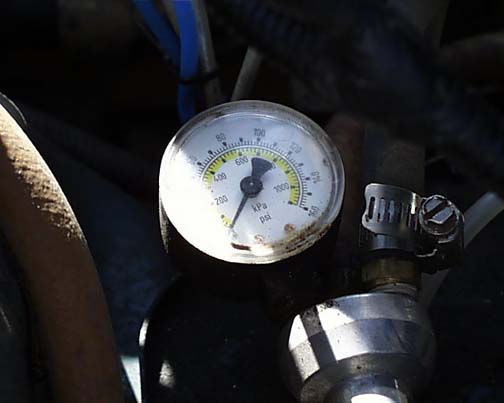 PRESSURE GAUGE - Vital to your system! You will regularly need to reference what pressure your system is pressurized to. Find a gauge that reads up to 160 or 200psi. You can find a variety of gauges (and many of these other accessories and fittings) at Home Depot or Lowe's type hardware stores.
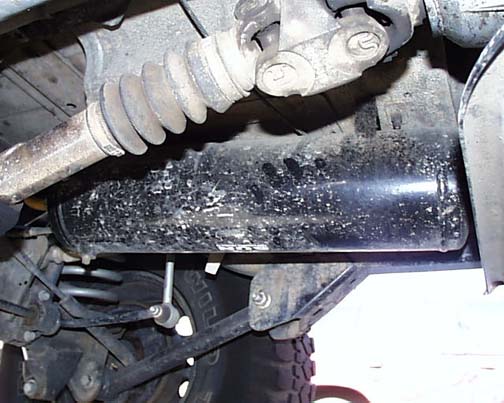 AIR TANK - There are many ways to add an air tank to your system. A tank will allow you to store more air, which will in turn allow you to use a small amount of air over a longer poriod of time (such as with air lockers), or provide a large amount of air quickly (such as using air tools). The more air you can store, the more you have at your disposal. Some use bumpers or roll bars as tanks as well. I bought a 2.5 gallon tank from Sun Performance and mounted it under the tub opposite the muffler. It has five 1/4" ports, that can be used for inlets, oultets, or accessories such as the pop off valve. My rear quick disconnect is connected to one of the ports on the tank.
 POP OFF VALVE - THIS IS THE MOST IMPORTANT ACCESSORY IN YOUR SYSTEM!!! The pop off valve is a pure safety feature. Buy one that is set for 150psi and screw it into the air tank or your manifold. Remember, pressurized air can cause damage and injuries if allowed to over-pressurize and explode. If your pressure switch fails, the pop off valve will release the pressure in the system once it reaches the preset level (150psi). Do not overlook this component!
Using the diagram above, assemble the pieces. Use thread-sealing tape on all fittings, and use brass fittings in all possible locations. Brass does not need to be really tightened down because the fittings will mesh well. If you have an air leak, use more tape. I mounted my manifold, along with my gauge, pressure switch, and check valve on the shelf below the power brake booster. The coalescing filter is mounted to the firewall just to the passenger side of center, and the hoses are run along with wiring harnesses where possible. The air hose also runs down the firewall and with the fuel lines back to the tank.
At this point, you are all set up to use your air compressor to inflate tires and rafts, matresses, and even run air tools. All you will need is an air chuck, tire gauge, coiled extension hose, and maybe a few other accessories. Okay, let's expand just a bit more...
Some information courtesy of the Jeep Tech pages.