
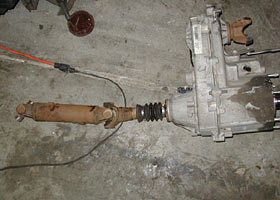
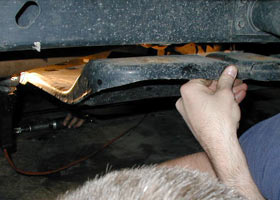
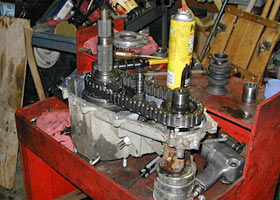
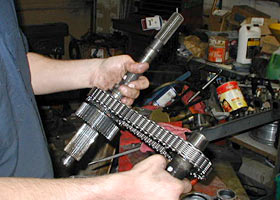
It seems that every time that Cole gets something new for Project Cross Trainer, I get conned into helping with the installation. While this is usually for my light-holding or tool-fetching abilities, his latest upgrade actually called upon my specialty; transmissions and transfer cases. After having worked in a transmission shop for 10 years, I have learned my way around gearboxes fairly well. Fortunately for the do it yourselfer, the JB kit does not require an intricate knowledge of the internals of your drivetrain, but just a basic understanding. The only special tools required to dive into this project are snap ring pliers (external), and a torque wrench. The average set of tools should be all that is needed beyond that. The one thing that will make this project much easier is removing the transfer case from the vehicle. It can be done in the vehicle and the JB instructions will tell you this, but I discourage you from doing it this way. The chance of something falling out of place or not sealing properly greatly increase by doing it this way. Saving an hour by leaving the unit in the vehicle could be lost later in removing it to fix a leak that could have been prevented. On to the install: 1) Remove the skid plate and disconnect the drive shafts, speedometer cable and/or wiring, linkage, vacuum harness, vent, and 4WD indicator switch harness. Be sure to support the transmission with a jack. 2) Drain the transfer case. 3) Remove the 6 nuts securing the transfer case to transmission. Lower the jack to gain access to the top of nuts if necessary. Once all of the 6 nuts have been removed, remove the transfer case from the vehicle. 4) Remove the front output shaft yoke. New Process says that you shouldn't reuse the nut, however, I have never had any trouble doing so, as long as I used "Loc-tite" upon re-assembly. Use your own judgement here. 5) Set the transfer case on the 6 studs around the front output shaft and support the front output shaft with a coffee can. 6) Remove the speedometer housing and drive gear from the unit. 7) Remove the extension housing and give it to the neighbor's kid to play with in the sandbox. 8) Remove the rear bearing snap ring. 9) Remove the rear housing bolts and housing. Pry the housing off using the tabs, if necessary. Do not pry against sealing surfaces. 10) Remove the case half attaching bolts and the rear case half. There is a slot at either end of the case where you can pry the case halves apart. Do not pry anywhere else. When the rear case half is lifted away from the front half, the oil pump will come with it. 11) Remove the oil pump screen and pickup tube from oil pump and clean thoroughly. 12) Lift the front output shaft, rear output shaft, and chain out of the front case as an assembly. 13) Remove the front output shaft from the chain. If you have a lot of off-roading time on your transfer case, it may be a good time to replace the chain. 14) Remove the snap ring that holds the synchronizer hub and drive sprocket on the output shaft and remove the drive sprocket. 15) The JB kit comes with two caged needle bearings that need to be pressed into the drive sprocket. 16)Once you have installed the bearings into the drive sprocket and lubed the bearings with petroleum jelly. The reason we used petroleum jelly is because it dissipates better and does not effect the transmission fluid like grease would. Install the sprocket and synchronizer hub onto the new JB output shaft with their respective snap ring. 17) Install the front and rear output shafts onto the chain and lower them into the front case half. 18) Clean the sealing surfaces of both case halves with brake parts cleaner and apply a thin bead of RTV sealant to the front case half. 19) Re-assemble the oil pump and install it into the rear case half. 20) While holding the oil pump in the rear case half, lower it onto the front half and install the bolts. The two bolts with the washers go into the holes with the dowel pins. Torque the bolts to 30 ft. lbs. 21) Install the new speedometer drive gear with the supplied snap rings. 22) Clean the sealing surfaces for the rear housing with brake parts cleaner and apply a thin bead of RTV sealant. 23) Install the new rear housing and torque the bolts to 18 ft. lbs. 24) Install the front and rear yokes. Apply a thin bead of RTV sealant to the inner flange of each nut and "Loc-Tite" to the threads. Torque the bolts to 110 ft. lbs. 25) Install the transfer case back into the vehicle without the transfer case lowering kit!!! For full installation instructions, check with JB Conversions and Tom Wood. This article is not intended to be a full how-to installation sheet.
|

|
Help spread the ROCKCRAWLER world!
|