|
If
you run a big engine and big tires, eventually it's going
to happen - you're going to break the output shaft on your
Dana 300 transfer case. It's just like what they say about
rolling your rig over; it's not if...it's when! And, unlike
an axle or a u-joint, an output shaft is not something you
can fix easily on the trail! Don't get me wrong, this is a
very reliable t-case, but it wasn't built to put up with high
horsepower, high torque engines, low gearing, and big tires.
How
big is big? Well, I think that's a relative question. I've
read that the Dana 300 will stand up with tires up to 38 inches,
but I think we need to look at the whole picture. I'm running
a built 401, a T-18 transmission, and Dana 44's with Detroits,
4.88 gears, and 35" Swampers.
I
know I'm pushing my luck on the diffs, but I carry spare front
and rear axles, and I run standard 1310 u-joints, hoping they'll
be the "fuse" in my drivetrain. So far, it has worked.
And, I don't know about you, but I don't want to be a stick
in the mud and break something I can't fix relatively quickly.
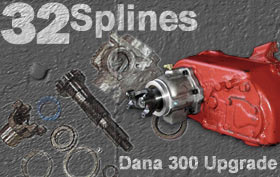
That's the main reason I decided to upgrade my Dana 300 with
Advance Adapters' 32 Spline Output Shaft.
The
kit comes with everything you need, except for some good RTV
sealer and medium strength thread-locking compound. I'm sure
you'll be impressed by the quality of the parts, especially
the massive new output shaft!
Doing
the Conversion
When you first receive your kit, unpack it and verify that
all of the parts are there. When I first checked parts against
the list included with the instructions, I thought I was shorted.
But, after reading carefully (good idea, right?), I realized
that everything was there. Some of the parts had been pre-assembled
by Advance Adapters, meaning, of course, less work for me.
I'm
going to assume that you've already removed your transfer
case from your vehicle and are ready to go. First, the bottom
access cover has to come off.
Second,
remove the rear output yoke. You should be able to tap it
off with a small hammer.
Third,
remove the front input shaft retainer. In my case, I had to
remove my Advance Adapters clocking ring first. See
"Clock It" from last month. The
retainer has two grooves for prying it out evenly. Use them!
The retainer and input shaft will come out as an assembly.
Next, remove the tailhousing. A minor point here, but AA's
instructions don't tell you to remove the speedometer gear
assembly, which you should do before removing the tailhousing.
The
toughest part of this procedure is next. You must remove the
output shaft tapered bearing from the shaft so that the shaft
can be removed out the front of the transfer case. I had been
told that with the yoke nut installed I could tap on the output
shaft while having a friend pry the bearing in the opposite
direction. WRONG!
AA
says the best way to remove the bearing is with a puller,
but I couldn't find one that would fit between the bearing
and the case. After much frustration, I realized that I wasn't
going to use the bearing again anyway. I promptly cut off
the outer race and used the puller setup pictured to remove
the inner race. (Thanks to Chris Sykes at Motor City Machine
in Cypress, Texas) If I hadn't had access to this puller,
I probably would have used my cut-off tool and a chisel to
do the job. Make sure to clean up any metal pieces from the
transfer case and your workspace.
After
this, installation was fairly easy. Remove the new shaft from
the new tailhousing assembly, making sure you retain the shim
race to maintain proper end-play. This has been pre-set by
Advance Adapters.
Also, make sure the pocket bearing in the new shaft (which
supports the rear of the input shaft) is lubricated, as well
as the shaft surfaces. I used good old Vaseline, but gear
oil or even grease will work.
Install the shaft through the front of the t-case, through
the slider hub, and through the gear. Next, install the thrust
washer and bearing onto the shaft. AA says the bearing should
be a "light press fit." Instead of pressing this
bearing on (not an easy thing to do), I decided to solicit
the help of a friend to hold the output shaft from the front
while I used a small punch and hammer to carefully install
the bearing. It worked like a charm.
Install
the speedometer snap ring and then the speedo gear. Then install
the shim race provided with the chamfer against the shoulder
of the shaft. This shim is specific to this output assembly
and keeps all the clearances where they need to be.
Using
a very small amount of RTV sealer, install the new tailhousing.
Although AA doesn't mention it, I had to use a small punch
to lightly tap on the inner race of the rear bearing to convince
it to slide down the output shaft.
Also,
AA's instuctions say to install the tailhousing with the stock
bolts, but they provide Allen head bolts to do this. Either
way will work fine. Put a small amount of RTV sealer around
the front retainer, line it up, and using a soft hammer to
carefully tap it into position. Once it's bolted down, install
the rear output yoke, splined rubber washer and torque the
nut to 150 ft/lbs.
At
this point, make sure everything rotates freely. If everything
checks out, install the bottom access cover using RTV or a
new gasket (which is not included), and using the new o-ring
provided, then install the speedo gear assembly. Last, but
not least, install the supplied vent fitting.
That's
it. With the exception of installing the transfer case back
in your vehicle, filling it with oil, and checking your driveshaft
length, you're done. Since the AA shaft is 1/2 inch longer
than stock, you may have to shorten your rear driveshaft accordingly,
as I did. Some of you will not need to do this. Just be sure
your driveshaft is not too long, or you could end up breaking
things, like a friend of mine recently found out. His rear
shaft was a bit too long, and over time, he actually broke
the pinion in his Dana 44 rear differential! A good driveshaft
shop can shorten any driveshaft for around $50.
Is
this upgrade right for you? If you wheel hard and run large
tires and/or horsepower, there's no doubt. I've had friends
suggest I upgrade to an Atlas II transfer case, instead of
wasting time and money on this upgrade. Don't get me wrong,
I'd love to have the brute strength of an Atlas, but considering
that I already had a perfectly good Dana 300, converting to
the 32 spline output shaft was a lot less expensive and I
really don't need the super low gearing for the kind of wheeling
we do, which is mainly climbing hills and ledges that require
a bit of momentum. Advance Adapters 32 Spline Output Shaft
helps put my weakest link back where I want it, at the driveshaft
u-joints, not inside my transfer case!
| RESOURCE |
Advance
Adapters
4320 Aerotech Center
Way
Paso Robles, CA 93446
Phone: (805)
238-7000 or (800) 350-2223
www.advanceadapters.com
|
 |
Jack
Brinks is an avid four wheeler and contributor here
at ROCKCRAWLER.com. Jack resides north of Houston,
TX and frequents many events in the Southwest.
Contact
Jack at jb77cj7@aol.com
|
|
|
(Click
on Photos to Enlarge)
|
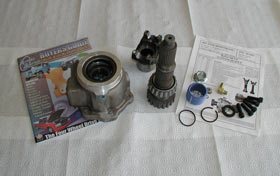
32 Spline Output Shaft Kit For Dana 300
|
|
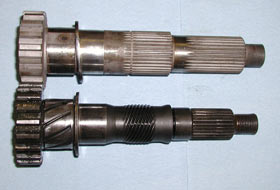
Comparison of Output shafts (32 spline top)
|
|
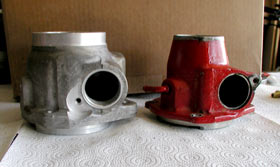
Comparison of tailhousing's (AA on left)
|
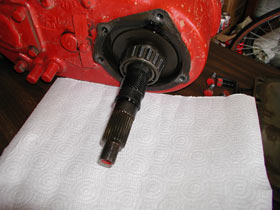
Original output shaft still in case |
|
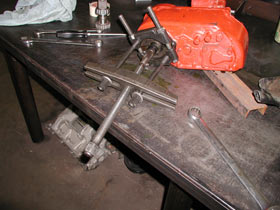
Trying to remove bearing with puller
|
|

AA speedo housing
|
|
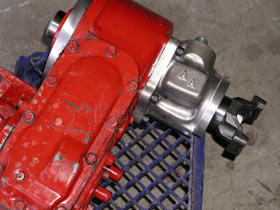
View of installed kit from underneath
|
|
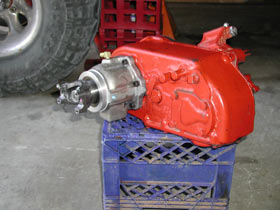
Completed Dana 300 with 32 spline shaft
|
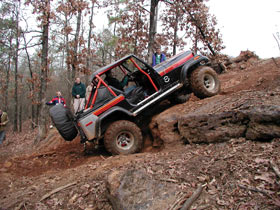
The 32 spline kit comes in handy at times like this. |
|