|
|
|||||||||||||||||||||||||||||||||||||||
| At this point you are really working toward the home stretch.The next step is to clean up the new edges you made while cutting. I used a small file to shave off any metal and even things out as best I could. Then, I used a black gloss spray paint to finish off the edges of the metal, just to make sure I don't get any rust down the road.
Now comes the fun part - installing the hood insert. After removing the tape from the edges of the aluminum (which took several minutes since it was dried on and the small pieces that didn't come right off were hard to see on the shiny aluminum), lay the panel on the hood, lining up the center marks (that you made before) and the four pre-cut holes in the panel that line up with the alignment holes from the template. Then, beginning in the center of the top and bottom drill the holes, install the bolts, washer and nut in each hole, then move to the next one. You do not want to drill all the holes at once, you want to move along one hole, one bolt at a time as the aluminum will bend slightly and configure to the shape of your hood. Also, one of the reasons I mentioned in the beginning about finishing the panel later is so that you can drill the holes with the panel in place an not make any errors that would mar or ruin the finish you put on it.
Now that you have everything you can basically reach from the front it's time to move to the rear of the hood. You will now be stretching the panel into place, making sure to put pressure on the panel before you drill each hole in order to make sure your drilled hole is as aligned as you can get it.
Now lift the hood back into place on your rig, tighten the front hinge bolt first with the hood aligned on the front. This will help you to get the sliding hinge nuts tightened up in a position to maintain the alignment of the hood. Then open it up and replace all the hardware you took off - the window bumpers, the sprayers, the ground strap, the hoses and any electrical wiring.
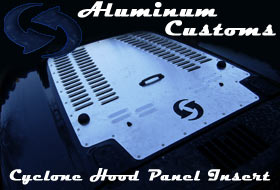
The Aluminum Customs Cyclone Louvered Hood Insert is reasonably easy to install with a few hand tools, and the look is quite pleasing when done. The additional air flow under the hood and the ability for hot air to leave when sitting still in desert climates or high altitude should make it easier for your vehicle to cool itself off.
I am very happy with the look of the louvers in raw aluminum, however I intend to powdercoat the piece in a gray/black vein to match the rear corners and tire carrier on my rig. Check out the Aluminum Customs website for more pictures on their customers' rigs.
|
|||||||||||||||||||||||||||||||||||||||


|
Help spread the ROCKCRAWLER world!
|