|
Custom Rear
Shock Mount
By, Jason "Korky" Haller
Well, for all of you
out there with great flex, but who are not satisfied, pay close attention
as the following article will give you wood. :) he he.. prolly don't
want to print that. My buddy Liquid Man and I decided that the only
way to get more flex out of the rear of our wranglers was to devise
new locations for the shocks. Note we are using the same shocks now
front and rear. Rancho 9000's (9012's?) 32" long ones. We figured
the easiest way was to use much longer shocks and pull them into the
center of the jeep making the amount of possible travel almost double.
Parts List:
- 1 - 1-1/2" x 1-1/2" x 1/4" x 42-1/2" Angle
Iron
- 4 - Shock Mounting Studs (usually included with new shocks)
- 1 - 2"D x 2" Schedule 80 Steel Pipe
- 2 - Rancho RS-9012 (YMMV)
Installation Instructions:
- Remove plastic fuel/brake/electric line holder from driver's side
upper shock mount.
- Remove both rear shocks.
- Drill two 1/2" holes 1/2" from center on one face of
the angle iron.
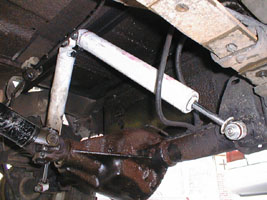
- Mount the shock mounting studs with the stud extending from the
outside edge of the angle iron.
- Slide the angle iron onto the top of the frame rails just to the
rear of the upper shock mounts with the vertical edge facing
forward.
- Carefully re-bend the rear brake line to provide adequate
clearance.
- Ensure angle iron is tight against the rear of the upper mounts,
flat on the frame, and centered from side to side.
- Clamp and weld angle iron to frame rails.
- Remove muffler and tailpipe assembly.
- Cut the 2"D pipe in half lengthwise leaving two half pipes.
- Drill and tap for a 1/2" bolt in the center of each half
pipe.
- Thread shock mount stud into half pipe so it extends from the
radius.
- Place a shock onto the new upper mount and insert bolt with pipe
attached to other end.
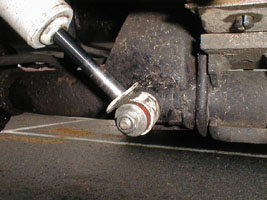
- Place half pipe against the axle tube so that the flat edges of
the half pipe are parallel to the axle tube.
- Use the shock to set the correct angle of the stud in relation to
the axle. Mark edges of half pipe and remove shock.
- Clamp lower mount to axle tube using marks from previous step.
- Weld lower mounts to axle tube along the two parallel sides.
- Repeat for other side.
- Install new shocks.
- Ensure that NO lines, wires, etc. interfere with shocks even when
articulated in both directions.
- Concerning the exhaust (YMMV): I turned the muffler 180 degrees
so the outlet was towards the frame and had a local muffler shop
fabricate a custom tailpipe. Regardless, make sure that the shock
will not contact the tailpipe when fully compressed!
- If so desired, you might want to grind the welds and paint them
to prevent rusting.
- Last but certainly not least, enjoy the droop!
Notes:
- Emergency brake cable may need to be rerouted to avoid contacting
the shocks and/or exhaust.
- Custom tailpipe cost is approx. $60
- Might want to consider a guard where fuel/brake/electric lines
contact angle edge.
- An unforeseen benefit to me was the mounting of the shocks is in
an ideal angle to prevent body roll. Driving a SOA rig, I noticed a
HUGE improvement in stability!
If you have any questions, feel free to e-mail me:
luv2jeep@redrose.net |


