Note: This story was originally run as the ACOS by Off Road General Store Mfg.. ORGS Mfg. was purchased by JKS Mfg. so please contact JKS with any questions you may have. |
|||||||||||||||||
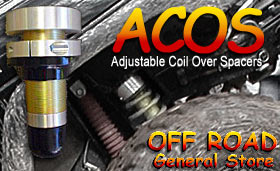
For some reason my Jeep has always seemed to sit lower in front than in the back. The first lift I installed was 3" and it didn't look too bad. But when I went to 5" springs I often got comments about the front end looking too low. When I added the body lift and 36" tires it was really noticeable. In an effort to level the Jeep I swapped out the worn out-rubber spring isolator with urethane ones that were 1/4" thicker. This resolved things for a while, but, eventually, I added a heavier front bumper and a new winch and I had to start all over again. This time I installed two spring isolators (by stacking one on top of the other). While this worked for a while, my front end was still a little too low. The front was pointed down and, quite honestly, it looked a little strange having a whole lot of clearance over the rear tires and significantly less over the front. At this point I started looking around for alternatives to stacking the two urethane spring isolators, but the problem I had was that the size of the spacers on the market didn't exactly fit what I wanted to do. I didn't really want to "lift" the vehicle anymore, I just wanted to level out what I already had. I started searching to see what I could find. I happened across a press release for Off Road General Store (ORGS) and their new Adjustable Coil Over Spacers (otherwise known as ACOS) and I had found what I was looking for. The ACOS install at the top of the coil springs and replace the factory isolator and the bump stop mount. They are adjustable from a minimum of 1-1/4" to a maximum recommended adjustment of 3". Depending on how your vehicle is set up, installation time and effort may be different. But rest assured that unlike using stacked urethane or rubber bushings you should only have to do this once. Installation on my TJ was very simple and took no more then simple hand tools in my driveway. I will not attempt to instruct you on disassembly of your front end. On mine, the springs will fall out with just a little force once the shocks, sway bar, and spring retainers are disconnected. I was very happy with the detailed instructions for this product. In fact, I questioned only a couple of things in the installation instructions but found that if you follow them they will lead to a surprisingly easy installation with no surprises. Kudos should be given to ORGS for not releasing a product before the instructions were complete - I know this is a small thing but in my opinion, this is often overlooked these days. Based on the thoroughness of their instructions, I will not duplicate the steps here but will provide a general overview only. Once the spring is out, remove the upper bumpstop from its cup by pulling on it and gently rocking it back and forth. This is the one place that may be more than a simple bolt on (and something you might want to check before you start). As you can see from the photo my bump stop cup(s) are bolted on. According to the ORGS instructions, some years are welded on and will require grinding, drilling and tapping to install. This will add some time to your installation. Once you have the bump stop cup removed, simply slide off any coil spacers or the factory spring isolator down and off of the end. Then, simply install the ACOS by sliding them over the stub that held the bump stop cup. Install the bolt through the bottom of the new bump stop extension and tighten it. Then twist the upper part of the assembly until it tightens against the top of the mount. Adjust the lower part of the assembly to the desired ride height. Tighten the Allen head lock bolt and the assembly is in place. Reassemble your front end and verify that the height is where you want it. I found that the minimum lift I was able to get out of the front end was closer to 1-5/8" than the advertised 1-1/4" but for my application this was fine. If more lift is needed, it is very easy to adjust the spacers. Keep in mind that 100% of the weight of the vehicle must be off of the springs and the spacers before you attempt to adjust them. I used a Hi-Lift jack on the bumper and a friend pushing down on the opposite side. This allowed my spring to drop away from the assembly far enough to adjust it down slightly. This is probably typical of minor adjustments. Larger adjustments (over 1") may require removing additional items or even the spring again - but no new parts would need to be purchased. One thing that I did find while doing this install is that the urethane bump stop extension that is part of the ACOS unit was slightly shorter (maybe 1/4") then the factory bump stop extension, thus allowing the wheel to move up slightly higher into the wheel well at full compression. Since there is no way to adjust the bump stop length this could be of concern in some situations. Of course, this will vary from vehicle to vehicle. On my Jeep this did not cause a problem, however, this is something you should consider for your vehicle and perhaps is the one place where I think that ORGS could improve the ACOS. I have been using the product for a couple of months now and have noticed no adverse affects. I was concerned about how it would hold up, especially at the top of the threads where my springs would rub against it when I flex. The springs on my TJ (like that of many others) actually drop out at the top of the spring mount at full flex. I was afraid this constant rubbing would have an adverse effect on the threaded area and perhaps it will over time, but to date I see no wear from it. ACOS are a practical addition to any suspension. They will allow you to adjust your vehicle side-to-side to compensate for any unevenness that you see, but in addition to that, I think they will save you money down the road. All four-wheelers (most that I know, anyway) are constantly making changes to their vehiclesm whether it's to make the trails you run easier and more enjoyable or to take you to the next level of trails. Whether you use the ACOS today for a mild lift or simply to level your vehicle, tomorrow you may need them to offset additional weight added to the front. When you need to, simply adjust the ACOS up to slightly raise the front or adjust them down to lower it. You can even adjust the front of the vehicle left to right if you need to. Like many people I enjoy comments from people about my rig. The ACOS doesn't stand out like a flashy paint job (then again, what does) but they seem to get quite a few comments from people on the trail. And I must admit, they do look a lot better than the alternative. I think this product does what it was intended to do and I would recommend it to anyone who was even thinking about installing urethane spacers, wanting to install a mild 1" or 2" lift in the front or simply needs to level out their vehicle. The installation was painless and the adjustability will be helpful in the future. Off Road General Store has a new product that is useful and needed by many.
|
|||||||||||||||||


|
Help spread the ROCKCRAWLER world!
|