|
Editor's note: Though Mike did this on a CJ, this should work fine on any vehicle, with possible modifications. |
|
|
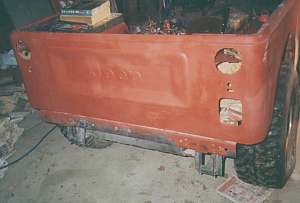
| One day, while on an off-road excursion, I opened my spare tire carrrier, parked on an embankment facing down hill. By not thinking and letting the carrier swing about, gravity took its course and sent the tire right into the tail light. In most cases a tire stop would work, but they can't protect against other objects like trail obstacles. The tail light was pretty much useless from that point on being smashed from the weight of the tire. About that time, our club president had also the same problem while backing into a tree on the trail.
At the local Autozone we were able to locate sets of stop/turn/tail lights for about $7 each (beats paying about 15 for the stock type lights that would only be damaged again) and the reverse lights for about $3-4 each. The lights mount flush, help avoid further contact with obstructions, and also look great. Here is a step by step process on how this was done. 1. Use the light housing gaskets to trace a layout. This will guide you in how much sheet metal you'll want to cut and will also determine where your back up lights go. Keep also in mind that you should mark where your sheet metal screws or bolts will be to avoid going over board. 2. After
you have your layout drawn, drill a 3/4" hole and start snipping
away with the tinsnips, being sure to stay within the boundaries you
marked previously. Its a good idea to keep a little sheet metal extra
around the edges to be filed away to keep a snug fit. On my CJ I had
to cut a little into where the fenderwell meets the body tub to allow
space for the tail-light. (Shown in Picture) 3. Place tail lights in place and then drill 3/4" hole where center of back up lights should go. If tail lights should not fit at first...file the edges a bit until it does. Screw in sheet metal screws in the 4 designated holes in the center of the reverse light. Re-assemble the tail lamps and reverse lights. 4. Follow wiring instructions included with lights. I've found that you may need to ground each light to the frame also. Especially if you happen to over cut a bit. A few extra tips: If you are concerned with ruining a good paint job by marking it, scratching, ect...I've found Duct tape works good to mark up the layout. Also with this..you can be a little more precise in making a layout, because you can use spray paint to mark where you want to cut. Its a good idea to keep a little touch up paint at hand to cover up any nicks or scratches that may come about along the way. If you happen to over cut in an area where the light housing would fasten to the body, small bolts work just as well as sheet metal screws. And if possible an air cut off tool would also help speed up the process of step number 2. |
||
|
|
||


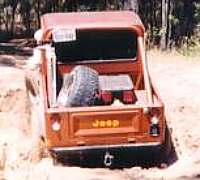 The
problem in both cases was that Jeep tail lights are mounted outside
of the body, which makes them prone to damage from trees, tire carriers,
and other trail hazards. The solution, of course, was to get the tail
lights out of harms way where they would not be in a spot were they
could get damaged just as easily again. This solution was found by having
the tail lights mounted flush with the body.
The
problem in both cases was that Jeep tail lights are mounted outside
of the body, which makes them prone to damage from trees, tire carriers,
and other trail hazards. The solution, of course, was to get the tail
lights out of harms way where they would not be in a spot were they
could get damaged just as easily again. This solution was found by having
the tail lights mounted flush with the body.