• Mopar Underground Jeep “Lower Forty”

    Jeep

    Mopar Underground’s Jeep “Lower Forty” takes the new Jeep Wrangler platform to a new extreme. The Jeep “Lower Forty” is equipped with massive 40-inch x 13.5-inch 0R20LT tires mounted on Mopar 20-inch forged aluminum wheels. The Mopar Underground crew added the aggressive wheels and tires to a stock, two-door Wrangler Rubicon without the use of a suspension lift. The team’s goal was to achieve added ground clearance without altering the vehicle’s center of gravity. To accomplish that feat, the team trimmed copious amounts of the body and fenders to provide the needed tire clearance. Once achieved, the team used a saw to chop out 3-inches of height from the windshield frame and increased the rake by 10 degrees.

    Jeep Lower Forty

    Custom front and rear fender flares were made 1-inch wider and 4-inches higher compared with a stock vehicle. A new one-piece-carbon-fiber hood with a Jeep CJ-like power dome and an all-new drop-down tailgate stamped with the “Jeep” logo were added to the vehicle to complete the exterior design.

    On the interior, an all-new roll cage was neatly integrated into the body tub and tied directly into the frame rails. The spare tirewas relocated to the cargo floor and a custom cargo rack, supplied by Poly Performance, was installed. Once all body modifications were completed the exterior received a fresh coat of Red Eye No. 3 paint, a custom color developed by the MoparUnderground team specifically for this project.

    Jeep Lower Forty

    Custom touches can be seen throughout the interior of the vehicle, including a color-matched center console and instrumentpanel. The seats were re-covered with Mopar’s Katzkin leather package in a two-tone scheme. The carpet was removed and a durable truck-bed liner was sprayed inside to protect the floor. Rugged Mopar floor mats complete the theme.

    Jeep Lower Forty

    The Mopar Underground team turned to the Mopar catalog for the vehicle’s mechanical upgrades. The Jeep “Lower Forty” features an all-new 5.7-liter HEMI® V-8 engine and a Getrag 238 six-speed manual transmission. Powertrain installations were handled by Burnsville Off-Road using an AEV installation kit.

    Mopar supplied Dana 44 front axles and Dana 60 rear axles equipped with 5:38 gears and Dynatrac prepared ARB air lockers to handle the vehicle’s massive tires.

    Jeep Lower Forty

  • Jeep JK at Superlift ORV Park

    01_morning_trailerAnyone paying attention knows that Jeep’s 2007 Wrangler (JK) is about the hottest thing to hit the four-wheeling market this year. Being all-new means that every aftermarket company in existence is scrambling to come out with goodies for it. While some of those companies will be late arrivals, others will be early on the scene. Of those early birds, some will have advantages over others.

    One of those with an advantage is Superlift. Our pals down South have some pretty good ties with the folks at DaimlerChrysler, as well as AEV. Those relationships allowed the Superlift gang some early access to the new JK. In fact, some of the testing was even done at Superlift’s ORV Park in Hot Springs, Arkansas. (more…)

  • Jeep Rubicon Locker Bypass

    Jeep Rubicon Locker Bypass
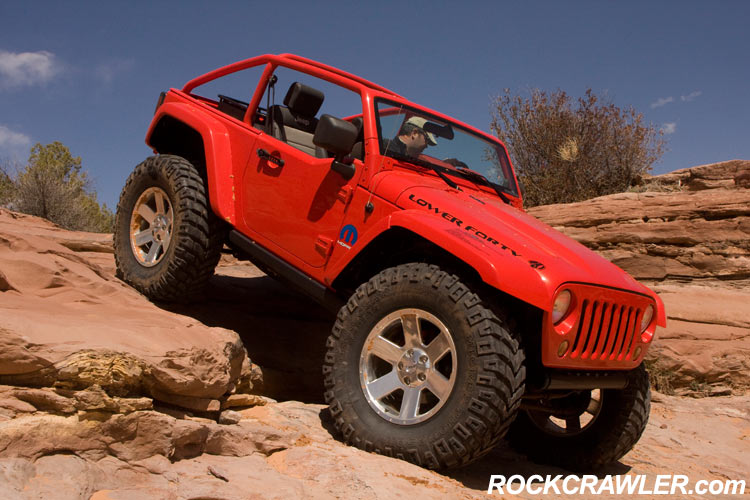
Jeep really nailed it right on the head when they released the Wrangler Rubicon. With dual lockers, Dana 44 axles at both ends, 31″ tires and more, there is little more that a Jeeper could want from an out-of-the-box rig.

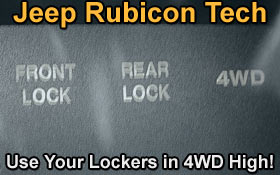
    One area where the Jeep Rubicon does fall just a bit short, however, is the way the lockers are set up to work. Most-likely designed the way they are for safety and liability reasons, the lockers only function when the transfer case is low range.

    Who cares, right? If you are sitting there asking that, then perhaps you’ve never been mired in a mud bog, been on a snow run, or hit the sands of Glamis. In these, and certainly other situations, low range just isn’t going to cut it. You need 4WD high or you’re stuck. Therein lies the rub.

    So there you are, stuck on a sand dune, nailing it with all you’ve got and you’re doing nothing but watching your fronttire sit still and maybe once in a while catch a little traction. Meanwhile, the rear is catching a bit now and then, thanks to the limited slip in the Rubicon, but it’s still not grabbing on like the real locker would. Oh, if only you could turn on those blasted lockers!

    Well, don’t tell your service writer this, but a few Jeepers got their thinking caps on and put their eyes on the Jeepservice manual schematics long enough to figure out how to trick the computer into letting him use his lockers in high range. There are several ways of doing it, and Bill Snowden (Willie G) chose the method shown here. Follow the easy steps below and you’ll be well on your way to locking ’em up, too.

    But first – a little disclaimer. Obviously, if you don’t know what you’re doing, don’t do the modification. Also, we canshow it to you, but we haven’t tried it ourselves here at RC HQ and we certainly won’t be held responsible for showing you kids how or telling you to do it. Using lockers in high range, especially on the road, can be very dangerous, which is why the good folks at Jeep wired them the way they did. So do the modification at your own descretion, be careful, and if you goof something up, don’t blame us. If you choose to try this yourself, you assume all risk associated with the use of any information contained within this article. And don’t be surprised if your service writer figures out what you’ve done and says no to your next warranty claim. That said, read on…

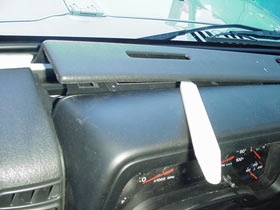
    As with most electrical installations, the first thing you’ll need to do is disconnect your battery. Then disassemble part of your dash. Begin by prying up the defroster vent panel by the windshield. You can use a flathead screwdrive or, like Bill, you can pick up a real trim tool from your Jeep dealer for about $3. Pry the trim in several places along until it pops out.

    Rubicon Locker Bypass
    Rubicon Locker Bypass

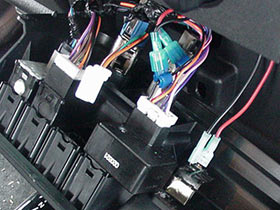
    Once the vent is out of the way, you will see two Phillips head screws. Remove these, and this will allow the center dash bezel to be carefully pulled off by pulling straight out and upward.

    Rubicon Locker Bypass

    Rubicon Locker Bypass
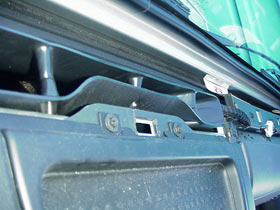
The HVAC controls and the switch panel will be exposed. There are four screws that hold the switch panel in place,. Remove them and pull the panel out of the dash. In the photos here, you’ll see the toggle switch for the lockers already installed. Bill chose to use an aircraft-style switch with a safety cover to activate the locker bypass. The switch used in this install is an inexpensive $10 switch. If you go topless and/or doorless often, we’d recommend using a military-spec switch. They are dust and moisture-proof and they do cost more, but they are worth it in the long run. You can get these from Kilby Enterprises.

    Looking at the back of the toggle switch, there is a red wire with a white stripe. If this wire is connected to the vehicle ground, it tells the computer that the transfer case is in low range. The computer will then allow the lockers to engage, as long as the vehicle is going less than 10 mph. The object of the modification is to trick the computer into thinking the transfer case is in low range, in order to allow the lockers to be turned on.

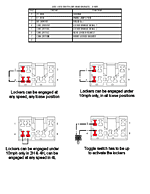
    Take a piece of wire and tap into the red/white striped wire, and run this to your switch. Then tap into the black wire and run that to other pole on the switch. When the switch is turned ON you will be able to use the lockers in any transfer case range. With the switch in the OFF position, the lockers operate in low range only.

    The safety toggle switch was used in order to prevent accidental use of the modification. Although any switch will work, or no switch at all, we do recommend this type of switch for the safest installation. See the chart above for other wiring options. The photos below should help you with the wiring. Click each one for a larger view.

    Rubicon Locker Bypass
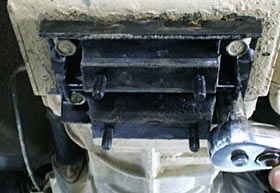
    Here you can see the red/white and black wires.
    Rubicon Locker Bypass
    Wires clipped on to stock harness.
    Rubicon Locker Bypass
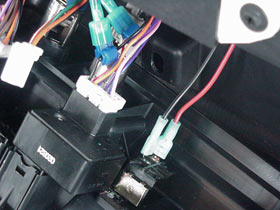
    Close-up of wires on harness.
    Rubicon Locker Bypass
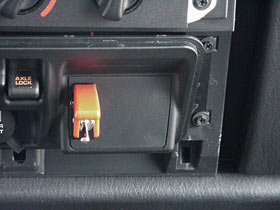
    Switch mounted on center dash bezel.

    Put everything back together and go test your Jeep out in a safe location. That’s all there is to it!

  • Fasteners: Making the Grade – A Technical Discussion

    Grade 5 vs. Grade 8 Fasteners

    Making the GradeI have been on a quite a few online email lists over the last 7 years or so, basically since they first came out. From the original Jeep-L list to the XJ-list to the Rockcrawler.com board, a common question comes up time and time again. No, I’m not talking about “how big a tire can I fit” or “which tire is better.” I’ll save those questions for the opinion section of everyone else’s website. I’m referring to the age-old question of “which fastener grade should I use?” It seems that everyone has an opinion on which grade is better but not many people can or will tell you why. Well, I’d like to explain the technical difference between a SAE Grade 8 (Grade 8) and a SAE Grade 5 (Grade 5) fastener. (more…)

  • How To Replace a Jeep Wrangler (TJ) Transmission Mount

    Jeep Wrangler TJ Transmission MountOne thing that every Jeeper will eventually need to replace on their trail rig is their transmission mount. It’s one of those unavoidable things that just go with the territory when using (abusing?) our Jeeps.

    How do you know when your tranny mount has given way? Well, if it’s really far gone, you won’t have a whole lot of wondering to do, especially if you have a manual transmission. I discovered my shot mount on the Project TJ one day at the top of a 4+ hill while leaning far over to the side and desperately calling for a winch line. With the Jeep perched nearly on its side, the entire driveline was able to shift over to the driver side, allowing the manual shifter to get pinned against the Tuffy center console. The weight of the transmission and Atlas II transfer case was enough to make the shifters not want to movein any direction. Once I was safe at the top of the hill and on level ground, everything flopped back into place and was fine. There’s the clue!

    Once I got the Jeep home I got out my floor jack and a block of wood. I put the wood on top of the jack and placed it all underneath the engine’s oil pan. I slowly jacked it up until there was just a little pressure under the oil pan and cranked slowly while watching over the transfer case skid plate. Sure enough, the driveline went up and I could plainly see that thetransmission mount had come apart.

    I took a quick ride to the Jeep parts counter and picked up a new stock replacement transmission mount and headed backhome, sure that this was a do-it-yourself job that I could easily handle in my driveway. For once, I was absolutely correct in my assumption!

    Swapping a transmission mount on a Jeep Wrangler TJ is a simple job that requires nothing more than a floor jack, a block of wood if the jack isn’t tall enough to reach, and some simple hand tools.

    I chose to go with the Jeep mount for two reasons. First, it was immediately available at the dealer. Second, though there are aftermarket companies making polyurethane mounts, I have heard that some allow a noticeable difference in driveline vibrations coming up into the tub of the Jeep, and I already have more of my share of vibes to deal with.

    Follow along as we guide you step by step through the installation:

    Jeep TJ transmission mount repair Step 1
    Be sure you have your parking brake on and the Jeep in gear (if manual) or in Park (if automatic). Also be sure to chock your wheels in case the Jeep decides to move. Remember, safety first! Also, be sure to wear safety glasses, as there will be plenty of dirt and rust falling from the bottom of the Jeep as you work under there. Place a block of wood on the jack. This not only helps it reach the oil pan on lifted Jeeps but also will spread out the pressure so you don’t dent the pan. Lift the jack until you just barely begin seeing the Jeep lift. This is for driveline support only.
    Jeep TJ transmission mount repair Jeep TJ transmission mount repair
    Step 2
    Underneath the transfer case skid plate, you will find 4 bolts. Note that our skid plate has been modified slightly for an Atlas II transfer case so your case may differ just a bit. Regardless, you will have these 4 bolts. The bolts hold the tranny mount to the skid plate. Remove the nuts on each one.
    Jeep TJ transmission mount repair Step 3
    Remove the six large bolts holding the skid plateto the frame of the Jeep. Be prepared! As you remove these bolts, plenty of rust and dirt will fall all over you. Protect your eyes! We recommend loosening all six bolts almost all the way and then removing them by hand the rest of the way out one by one. Remember, once they are out, the skid will fall. Be ready, as it’s very heavy! Bend your knees up to help support it as it comes down. Slowly ease it down onto your chest androll it out from underneath the Jeep.
    Jeep TJ transmission mount repair Note
    Here you can see the tranny mount while the skid plate is half-removed. You can clearly see that the rubber bottom has come loose from the main part of the mount. Yikes!
    Jeep TJ transmission mount repair Note
    With the skid plate dropped, you can plainly see how the tranny mount gave up. The metal rod that goes between the tabs had come loose when the tabs bent outward. Gonzo!
    Jeep TJ transmission mount repair Step 4
    The tranny mount is attached to the transmission by four more bolts. Simply remove them and catch the mount as it falls loose.
    Jeep TJ transmission mount repair Note
    Here you can see the old mount in two pieces (left) and the new mount (right). This is a very typical failure for this mount and is to be expected on any rig hitting the trails or high-mileage rigs, in general.
    Jeep TJ transmission mount repair Step 5
    Finishing the job is a piece of cake. Simply attach the new mount with the 4 bolts then the skid plate, then the bolt the skid back on to the frame just enough to hang it. The skid is the toughest part. Lay it on your stomach and using your knees for support, get it back up in place. If you have a gut, you can push with that, too. Finally, with the skid still slightly loose but in place, align the four mount holes and get the nuts on them. Then tighten the skid up to the frame and follow up by tightening the nuts down on the mount. You’re done! Don’t forget to remove the jack!