It's Just
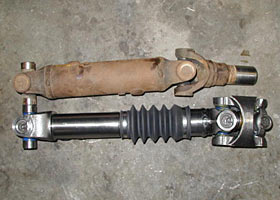
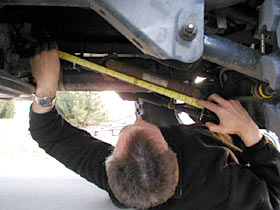
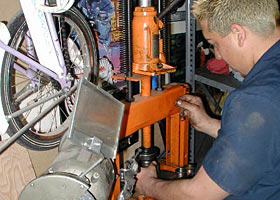
a Drive Shaft right? Last year in Moab at the Easter Jeep Safari, Tom had a booth set up where he was making and repairing drive shafts for people. There was almost always a crowd around his booth. At first, I thought that lots of people must have needed stuff worked on. But after watching for a while, it was kind of entertaining. It was like watching an artist paint. Tom's knowledge and ability to create, in my opinion, the perfect drive shaft left no questions in my mind about where to turn. He likened the difference between a custom shaft and a pre-made shaft to the difference between an off-the-rack suit and a custom-tailored suit. Before ordering a drive shaft, you must first install the SYE kit in order to have proper measurements. I called Tom to order my drive shaft he had me measure the distance from the rear of my transfer case to the center of the u-joint on the rear axle side. He used this measurement to perfectly fit the drive shaft to my Jeep. Since the shaft is longer than the factory shaft by several inches, we had the ability to use a C/V joint at one end of the shaft. By basically using 2 u-joints working together, the C/V joint helps even more with the shafts overall angle, and therefore its ability to reduce vibrations. The shaft also incorporated an expandable section in the middle to allow for the travel of the suspension. When my shaft arrived two days later I was very impressed with the craftsmanship and overall quality. The polishing and clear coat also made it very pretty. So if my Jeep ever falls over I can take it out and use it to signal for help! (Ok, so that may never happen, but it does add a very nice custom look!) Editor's Note: Be sure to plan accordingly before doing the installation and keep in mind the wait for the drive shaft to be built. Tom typically turns a shaft around within a day or two and will ship overnite if you need it in a hurry. He also offers extended replacement warranties on his shafts. Lions, Tigers
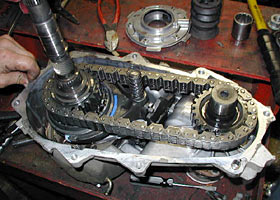
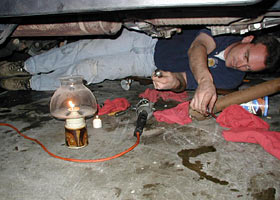
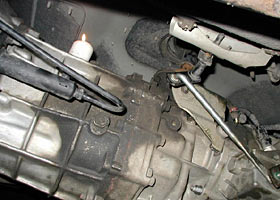
and Bears OH MY! Last year I went to Arizona to meet up with Don Bernier and the Geckos for the Goodyear Extreme Rock Crawling Championships (which they won, by the way). On the way down there I blew up an NP231 transfer case in my 1987 Wrangler. The case that had 280,000 miles on it finally wore out the range shift fork. I found myself stranded at a hotel in Phoenix, AZ. With some advice from then JP Magazine Editor, Rick Pewe' I was able to find the parts at a local shop. I was able to rebuild the transfer case in the parking lot of the hotel with a socket set, a few wrenches and a flat blade screwdriver. Although it can be pretty simple stuff, if you don't feel comfortable with it, you can always take it to your local shop and have them do it. We did our install of the JB conversions kit with the Tom Wood Drive shaft in a very tight residential garage. It is actually possible to do the install without taking the transfer case out of the Jeep, however, we have just found it easier to dive in with both feet, take the skid plate off and remove the case. You can check out the pictures to see the steps involved and check out Tom Wood's website for some great directions. The install took us about four hours to do. The last two hours we worked with the light of an oil lamp and one candle. As luck would have it, the power in our neighborhood went out just before we were ready to re-install the case. Since it was 10:00 PM this made for a VERY dark garage. I have now added a candle to my trail tool kit. The one small candle on top of the transmission gave us enough light to finish the install. The only part of the installation that you might not be able to do is press in the two bearings that were required for the TJ transfer case. Some cases do not need these pressed in. Just find a local mechanic that will be willing to press these in for you when you are ready to do the install. Other than that, it is so simple that you can do it in the dark!
|
||||||||||||||

|
Help spread the ROCKCRAWLER world!
|