whiterhino
Wheel'in since 1976
You mean that lil Rich fella? Yes he seems to be a slacker. So John, where are your updates on your JHF buggy?
Follow along with the video below to see how to install our site as a web app on your home screen.
Note: This feature may not be available in some browsers.
This site earn a commission from merchant affiliate
links, including eBay, Amazon, Skimlinks, and others.
All of the above....our 300m Branik front/rear inners are identical....the JHF diffs will "drag" over the same spot (less thinking about clearance)... plus added protection for the JE Reel driveshaft (using the links)...additionally @Lil Rich is planning a rear winch mounted to the axle and this offers plenty of centered space to install (I may do the same, not to that point in my thinking yet)I see both you guys are running offset rear differentials. Are you doing for more centered ground clearance or common spare inner shafts with front or some other reason?

WMS is 70 (pretty standard for a trail rig). I know a few locals that run narrower for comps, then add spacers for the trail.Good thoughts, thank you. What WMS width did you go for?
What drive shaft u-joints you plan on using?
(the rear has taken a dent or three, and runs a JE Reel with Toy joints now)My old rig was 69 wms/ 88 overall and seemed to work good with 110wb sounds about on course for yours. Never been around toyota shafts but always hear they work well. Your talking about the 1350 at front output of tcase? Is there nothing available to use toyota joints on the Dana 300 to keep everything the same?WMS is 70 (pretty standard for a trail rig). I know a few locals that run narrower for comps, then add spacers for the trail.
I'm a Toyota guy....so the rear shaft will be 100% Toyota joints. The front will need a 1350 at the yoke, then Toyota from the carrier to the case. JE Reel is building with OEM Toyota supplier parts, and it's hard to beat the strength and longevity of their stuff. I believe the front driveshaft in my 1996 80-series is stock, with only 299,000 mall crawling miles on it
I don't believe there's room to do a flange on the front output, and I also have never found a yoke-style connection for anything Toyota. Most of my rigs are mixed-joints...even the FZJ80 runs smaller Toy front u-joints and the larger rears....from the factory. My old FJ40 front two piece shaft was 1310 to Toy to Toy. The joys of cross-breedingMy old rig was 69 wms/ 88 overall and seemed to work good with 110wb sounds about on course for yours. Never been around toyota shafts but always hear they work well. Your talking about the 1350 at front output of tcase? Is there nothing available to use toyota joints on the Dana 300 to keep everything the same?

")

Might add one, but it won't take up dash space....fuel senders are notoriously problematic in a buggy, roll/flop once and you jar them and they stop working. A 12 gallon cell is plenty for a single day anyways.No fuel gauge? Just make sure you are full at the start of the day and know you won't run out?
I somewhat agree. The gauge in my YJ (aftermarket tank/sender) started out spot on. Now, a full tank (17 gal) = 3/4 on the gauge. WTF Empty on the gauge = 8 gallons left. (1/2 tank) Since I burn about 8 gallons on a full day of wheeling I just make sure I fill up or show at least a half tank (maybe 12 gallons) on the gauge. Although not accurate, the gauge is a good indicator of where I am at. I've tried to figure out what changed. I've run new wires, checked ohms, etc. Everything checks out but for whatever reason it's not accurate. Maybe it's due to your comment above about roll/flops. It's seen it's share.Might add one, but it won't take up dash space....fuel senders are notoriously problematic in a buggy, roll/flop once and you jar them and they stop working. A 12 gallon cell is plenty for a single day anyways.
I spent the last 4 years on propane, where you don't just "fill up" in the morning....you grab a spare tank. Keeping fuel in the tow rig and topping off in the morning will be super easy....and it won't take more than a trip or two to understand how thirsty the rig is.
The cell is getting a Holley Hydromat, so it will use 99% of any fuel available
Trans should come out the bottom easy enough....it went in that wayGreat work. I'm enjoying watching your build. What's the plan on pulling the Trans when needed? Tube Clamps on the whole dash section?
") Engine hoist from above to lift/release as it moves back, then onto a jack to lower down. Ideally it never comes out...
Engine hoist from above to lift/release as it moves back, then onto a jack to lower down. Ideally it never comes out...Never say never. LOLTrans should come out the bottom easy enough....it went in that way
ideally....
Although, I do have a full set of tube clamps for the dash bars....just hoping to not need them.
Indeed!!! I just had to pull my tranny and TC to replace the front seal in the TH400. What a PITANever say never. LOL
 The IDIOT that built this Old Red Farm Truck did it so the Atlas has to come out the top and the transmission out the bottom.
Who's dual handle cutting brake is that? I see Wilwood only makes a single handle.
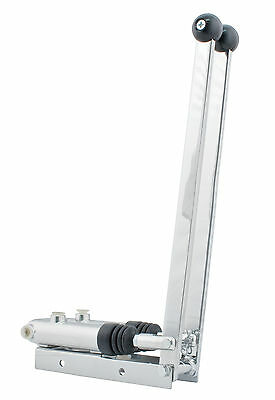
Cutting brakes (older thread)Who's dual handle cutting brake is that? I see Wilwood only makes a single handle.
Started on the dash tonight, got a couple done before it turned wine:30
Cutout for the M4O shifter turned out perfect...and the engine air intake will have just enough clearance.
View attachment 15103
View attachment 15104
Oh yeah, the front diff arrived yesterday from Nitro Gear - NEW Toyota case built with their spool and 4.88 gears. Bling bling!
View attachment 15105
